
Architectural Restoration: Making a Rubber Site Mold to Replace a Damaged Column
Project:
Architectural Restoration: Making a Rubber Site Mold to Replace a Damaged Column
This commercial building is being updated for reopening. A series of identical plaster columns line the large space [Figure 1] and some are damaged [Figure 2].

Figure 1

Figure 2
To replace the damaged columns, a rubber mold is made of an identical intact column in order to cast plaster replacements. The tutorial is below:
|
Mold Making Method: Brush-On Polyurethane Rubber Mold with Two-Part Plaster Mold Shell Materials & Supplies Needed for this Project: Poly PT Flex 20 Rubber |
Scroll to the end for a video tutorial of this process.

Step 1: Determine Mold Area
Begin by determining how much of the intact column needs to be molded. These columns are only partially damaged, so only the lower half is focused on.

Step 2: Apply Sealing Agent
Pol-Ease ® 2350 Sealer & Release Agent is white petrolatum dissolved in mineral spirits and is considered semi-permanent. This product can be brushed or sprayed onto the model (for spraying, use a Sure Shot Atomizer). Once applied, allow it to dry before applying any rubber. Solvent evaporation typically occurs within an hour of application and very porous models may require more than one coat.


Step 3: Construct Flange Supports for the Top & Bottom of the Mold Area
Construct supports to be used to build-up rubber flanges on the top and bottom of the mold. These flange supports are made from spare wood and cardboard, but other materials can be used in their place. A wooden support already exists at the bottom of the mold area, so a cardboard flange is rested on top of it.


If the shim material is porous, it must be sealed. Paste wax can be used for this step.

Step 4: Apply Release Agent
Apply Pol-Ease ® 2300 Release Agent. Spray and brush it out with a dry brush onto the column, shims, and walls immediately surrounding the column. If the plaster castings need to be painted later in the process, use Pol-Ease® 2500 Release Agent instead.
Pol-Ease 2300 Release Agent is being used because we’re working with a polyurethane rubber mold; this would not be the appropriate choice when working with silicone rubbers.


Step 5: Thoroughly Mix Rubber
For this project, we’re using Poly PT Flex 20, a soft, polyurethane rubber. This rubber is not very often used for this application; however, the fast working time of this product makes it ideal for the time frame (see “Popular Product Options” at the end of this section for recommendations on rubbers that are most often used for this type of application).
Poly PT Flex 20 has a 1A:1B mix ratio (by volume or weight), a 5-minute working time, and a 1.5-hour demold time.

Begin by preparing a small batch of Poly PT Flex 20 by adding Part A and Part B together and mixing thoroughly (Part B has to be shaken first before mixing with Part A). Scrape the sides and bottom of the container while mixing. Working in small batches is the best approach because of the short working time of this product.

|
Popular Product Options for this Application For standard on-site production molds, we often recommend the following products: Polygel® 35 Brush-On Rubber – this option is a self-thickening polyurethane rubber that becomes immediately thixotropic when Part A and Part B are mixed together. Specifications: 1A:1B Mix Ratio | Shore A35 | 8-10 Minute Working Time | 8-12 Hour Cure Time | Cured Color: Light Blue (varies) | or Poly 74-30 Rubber with Poly Fiber II – Poly 74-30 is a pourable polyurethane rubber. When mixed with Poly Fiber II thickening agent, it can be thickened to a brushable consistency. Poly 74/75 Part X Accelerator is also often added to the mixture to speed the working/cure time. Specifications: 1A:1B Mix Ratio | Shore A30 | 25-30 Minute Working Time | 16 Hour Cure Time | Cured Color: Varies | |
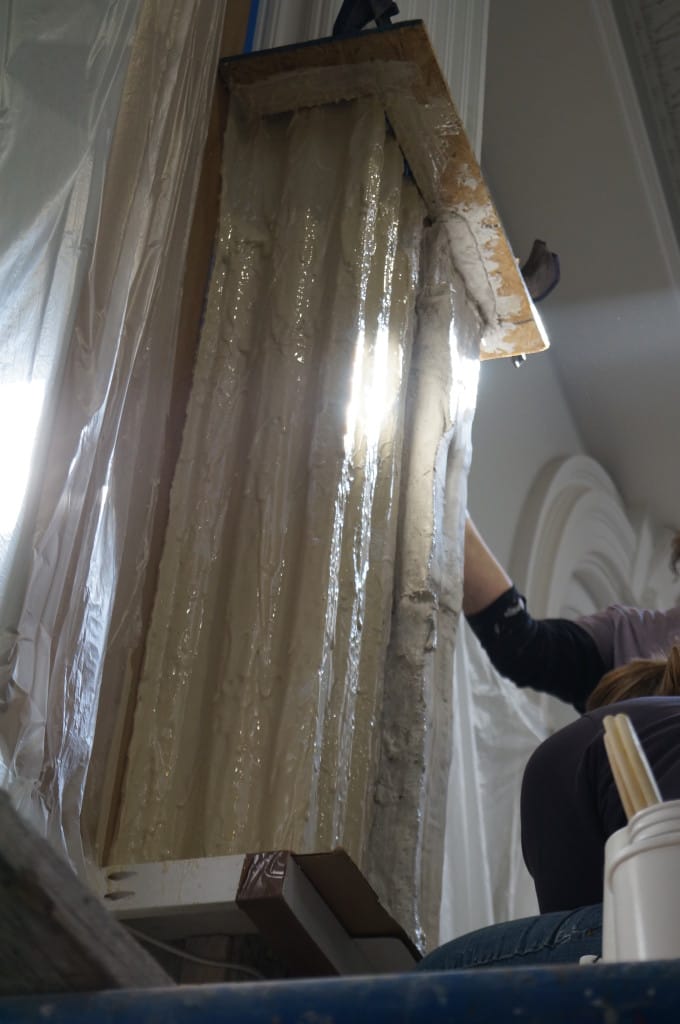
Step 6: Brush On Rubber
NOTE: Poly PT Flex 20 is a pourable rubber (it has a mixed viscosity of 520 cP). Typically, when making a brush-on mold with a pourable rubber, a thickening agent (e.g., PolyFiber II) needs to be added to the mix in order to the bring the rubber to a brushable consistency. The first layer of rubber applied to the model should be the thinnest (the least amount of thickening agent should be used in this batch), in order to penetrate all of the details of the model. More thickening agent can be added to additional layers. In this case, we found that thickening agent was not needed because of the fast cure time – this is not typically the case.
Apply layers of rubber using disposable dry brushes until a mold thickness of at least 1/4″ is reached. Typically, 3 to 4 layers are needed. Allow each layer to “gel” before applying the next one – the rubber can still be “tacky”, as long as it is gelled enough that it does not pull away. Poly PT Flex 20 usually needs about 10 minutes in between layers.


Allow the rubber to fully cure (~1.5 hours at room temperature) before proceeding to the next step.

Step 7: Apply a Release Agent
Apply and brush-out Pol-Ease 2300 Release Agent onto the cured rubber mold, shims, and walls immediately surrounding the mold. Paste wax can also be used for this step.

Step 8: Construct a Two-Part Plaster Mold Shell
This tutorial features a two-part mold shell made out of plaster and strips of burlap (burlap is used for reinforcement and easier application). Other Options: Our polyurethane plastics (e.g., Poly 1512X liquid plastic) work very well as a mold shell material when mixed with PolyFiber II thickening agent.


Mix the plaster until it is thick enough for vertical application.


Fold plaster-soaked burlap along flange; this area needs the most reinforcement.


Fold burlap/plaster to create a thick flange at the center of the column. This will form a parting line where the two mold halves come together.

Construct the second half of the mold shell, but make sure to apply paste wax (or other release agent) to the existing flange before allowing the two halves to meet.


Allow the plaster to fully cure before moving on to the next step.
Step 9: Remove the Plaster Mold Shell
Drill holes through the raised flange to later add hardware (e.g., nuts and bolts) to secure to the two halves together when casting.

Carefully remove the flange supports.

Use a chisel (or similar tool) to gently begin to separate the two sides of the mold shell.


In conjunction with a hammer, it can also be used to remove excess plaster from the edges.


Insert wooden shims (or similar items) between the two halves of the mold shell to encourage separation and then carefully remove one half of the mold shell, followed by the other.

Secure the two halves of the mold shell together with hardware.


Stabilize the mold shell as necessary.


Step 10: Carefully Remove the Rubber Mold
Carefully loosen all of the edges of the mold before removing the entire thing. Slowly remove the mold from the column little by little starting from the top.


Step 11: Prepare the Mold for Plaster Casting
Place the rubber mold in the plaster mold shell in the proper position.
Poly PT Flex can be demolded after 1.5 hours; however, we do not recommend using the mold for casting purposes for ~24 hours after demolding.


Step 12: Cast Plaster in the Mold
A foam insert (or other material) can be suspended inside of the mold to reduce the amount of plaster needed.

This was the first plaster casting taken from the mold (before touch-ups and installation):

Video Tutorial